Armor of God
Ephesians 6:13-17
In spring 2023 I taught a 13-week combined 3rd-8th grade class, boys only. We studied stories from Judges, partially memorized Ephesians 6:10-17, tand made our own "armor of God". I had 4 kids who finished their armor and I wanted to save the ideas we came up with! I encouraged creativity, but they did end up with similar ideas.
(full supply list and pictures of our armor below the explanations)
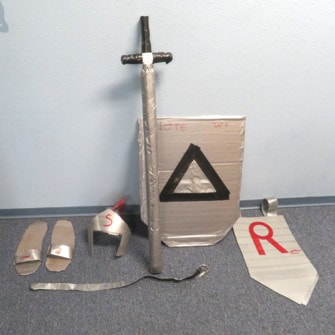
BELT of TRUTH: use two 1 1/2" (or maybe they were 1 1/4"?) D-rings per belt, doubling the duct tape and attaching the 2 D-rings to one end; to wear the belt, thread the end (we trimmed ours to make a "U") through and back; don't forget to write "truth" on the belt (Sharpie works great)
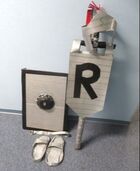
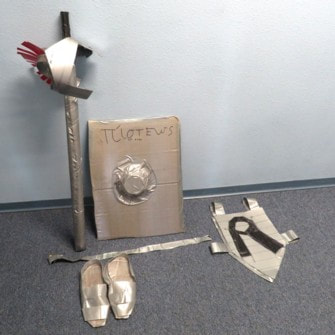
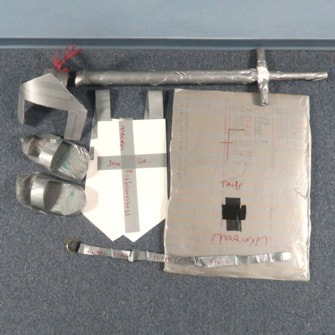
BREASTPLATE of RIGHTEOUSNESS: I let them choose their shape and we cut out 2 apiece from poster board (for front and back), put duct tape across the outside of each one, made duct tape straps to attach them at the top (at least 1 kid did side straps also and could still get it on and off), and then put "righteousness" or an "R" on it with Sharpie
SANDALS of PEACE: they traced their feet (with or without shoes - their choice) onto cardboard and I used a utility knife to do most of the cutting; then they wrapped duct tape around the soles, put 1 or 2 straps across the top, some of them put strips around the edges (more like slippers), and they put "peace" or a "P" on their shoes; the shoes were the hardest part of the armor and they weren't all super happy with what they ended up with
SHIELD of FAITH: they chose their shape and then used a hacksaw to cut the cardboard (I'd found a couple of boxes that had extra-tough cardboard) (they really enjoyed the hacksaw!); they covered the front with duct tape (to save a few pennies use "basic" instead of "standard" duct tape, but I wouldn't on most of the other armor pieces, since it doesn't stick nearly as well); 2 of them covered disposable bowls with duct tape to attach to the front; one made his straps from doubled duct tape, but another really wanted to use a belt, so I dug out some old belts my husband had discarded and we cut them for the straps and 3 of the kids did that; the backs each have 2 straps, top to bottom so that they can slide their arms through the first one and grip the 2nd strap; I used superglue to attach the straps and then duct tape to hold it while it dried...that was mostly successful (one of the belts kept trying to just peel off its outer layer and detach from the superglue); and then they put an "F" or "faith" on the front (one wanted his "faith" to be in Greek!)
HELMET of SALVATION: I made a helmet outline (saved as a pdf at the bottom) that we used to trace onto poster board; we covered it with duct tape and make a strap to go around the back and one over the top (from poster board and also covered with duct tape); we attached the straps to the helmet with duct tape, but I later added superglue and used clothespins to hold it while it dried; for the fringe we covered red construction paper with packing tape, folded one edge at maybe 1/2" wide and cut the fringe to that fold line - we could then bend it along the fold and tape the fold to the top strap of the helmet; last they added an "S" to the helmet
SWORD of the SPIRIT: I'm lucky that my youngest daughter is a foam sword expert, so these went great! - the swords were made of 3/4" PVC pipe, a long piece for the blade and 3 shorter pieces for the hilt (I was thankful that we have a PVC pipe cutter, but you could use a hacksaw, carefully), attached by a 3/4" PVC cross (shaped like a + and they were a bit pricey, but worth it), which held them without gluing, we just made sure to duct tape the joints; the blade was covered in 3/4" pipe insulation and then we wrapped the blade and hilt in duct tape (make the insulation longer than the blade and then you can squeeze it at the tip and duct tape it so that the end is "safe"); and last wrote "spirit" or added an "S"
As I said, it took 13 weeks (working around 25 min per week), but I'm quite sure they'll remember it for a long time!
Supplies: poster board, cardboard, duct tape (we went through most of 3 rolls, I'm guessing), D-rings (for the belt), 3/4" PVC pipe (maybe 4' per sword), 3/4" PVC cross, 3/4" pipe insulation (bit less than 3' per sword), good scissors, hack saw, utility knives, super glue, packing tape (may or may not use it), thick red paper (for the helmet "fringe"), Sharpies, pencils (for tracing), optional belts (for the shields), PVC pipe cutter (can use a hacksaw if you're careful)
Ephesians 6:13-17
In spring 2023 I taught a 13-week combined 3rd-8th grade class, boys only. We studied stories from Judges, partially memorized Ephesians 6:10-17, tand made our own "armor of God". I had 4 kids who finished their armor and I wanted to save the ideas we came up with! I encouraged creativity, but they did end up with similar ideas.
(full supply list and pictures of our armor below the explanations)
BELT of TRUTH: use two 1 1/2" (or maybe they were 1 1/4"?) D-rings per belt, doubling the duct tape and attaching the 2 D-rings to one end; to wear the belt, thread the end (we trimmed ours to make a "U") through and back; don't forget to write "truth" on the belt (Sharpie works great)
BREASTPLATE of RIGHTEOUSNESS: I let them choose their shape and we cut out 2 apiece from poster board (for front and back), put duct tape across the outside of each one, made duct tape straps to attach them at the top (at least 1 kid did side straps also and could still get it on and off), and then put "righteousness" or an "R" on it with Sharpie
SANDALS of PEACE: they traced their feet (with or without shoes - their choice) onto cardboard and I used a utility knife to do most of the cutting; then they wrapped duct tape around the soles, put 1 or 2 straps across the top, some of them put strips around the edges (more like slippers), and they put "peace" or a "P" on their shoes; the shoes were the hardest part of the armor and they weren't all super happy with what they ended up with
SHIELD of FAITH: they chose their shape and then used a hacksaw to cut the cardboard (I'd found a couple of boxes that had extra-tough cardboard) (they really enjoyed the hacksaw!); they covered the front with duct tape (to save a few pennies use "basic" instead of "standard" duct tape, but I wouldn't on most of the other armor pieces, since it doesn't stick nearly as well); 2 of them covered disposable bowls with duct tape to attach to the front; one made his straps from doubled duct tape, but another really wanted to use a belt, so I dug out some old belts my husband had discarded and we cut them for the straps and 3 of the kids did that; the backs each have 2 straps, top to bottom so that they can slide their arms through the first one and grip the 2nd strap; I used superglue to attach the straps and then duct tape to hold it while it dried...that was mostly successful (one of the belts kept trying to just peel off its outer layer and detach from the superglue); and then they put an "F" or "faith" on the front (one wanted his "faith" to be in Greek!)
HELMET of SALVATION: I made a helmet outline (saved as a pdf at the bottom) that we used to trace onto poster board; we covered it with duct tape and make a strap to go around the back and one over the top (from poster board and also covered with duct tape); we attached the straps to the helmet with duct tape, but I later added superglue and used clothespins to hold it while it dried; for the fringe we covered red construction paper with packing tape, folded one edge at maybe 1/2" wide and cut the fringe to that fold line - we could then bend it along the fold and tape the fold to the top strap of the helmet; last they added an "S" to the helmet
SWORD of the SPIRIT: I'm lucky that my youngest daughter is a foam sword expert, so these went great! - the swords were made of 3/4" PVC pipe, a long piece for the blade and 3 shorter pieces for the hilt (I was thankful that we have a PVC pipe cutter, but you could use a hacksaw, carefully), attached by a 3/4" PVC cross (shaped like a + and they were a bit pricey, but worth it), which held them without gluing, we just made sure to duct tape the joints; the blade was covered in 3/4" pipe insulation and then we wrapped the blade and hilt in duct tape (make the insulation longer than the blade and then you can squeeze it at the tip and duct tape it so that the end is "safe"); and last wrote "spirit" or added an "S"
As I said, it took 13 weeks (working around 25 min per week), but I'm quite sure they'll remember it for a long time!
Supplies: poster board, cardboard, duct tape (we went through most of 3 rolls, I'm guessing), D-rings (for the belt), 3/4" PVC pipe (maybe 4' per sword), 3/4" PVC cross, 3/4" pipe insulation (bit less than 3' per sword), good scissors, hack saw, utility knives, super glue, packing tape (may or may not use it), thick red paper (for the helmet "fringe"), Sharpies, pencils (for tracing), optional belts (for the shields), PVC pipe cutter (can use a hacksaw if you're careful)
|
|
| armor_of_god_helmet_outline.pdf |
